Formbird Ubuntu 18.04 / MongoDB Installation
Ubuntu 18.04 Installation - MongoDB Based Primary DB
The following script will install all the dependancies required for a Formbird installation on Ubuntu 18.04, using MongoDB as the primary database. The following installation assumes an installation on a clean Ubuntu 18.04 and installing as default.
It should take approximately 30 - 40 min to perform the base installation, although times will vary depending on internet speed, server speed etc.
Alternatively download a copy of the of the following install on a VirtualBox server, see those instructions here.
Step 1 - Installation user requires sudo access.
The user that you are doing the install under wil require sudo permissions. This is easily done by editing either the /etc/sudoers and providing sudo access to your user, alternatively add the ubuntu user to the /etc/group. For security reasons, do not run the formbird application under a user with sudo access.
Step 2 - Ensure the server is up to date
sudo apt update
sudo apt upgrade -y
sudo apt autoremove -y
Step 3 - Install Dependancies
To simply install the dependancies execute the following
curl -s -L http://download.formbird.com/formbird-2.2.x-install-ubuntu-18.04-mongodb-dependancies.sh | bash
You can also download and run it locally with
wget http://download.formbird.com/formbird-2.2.x-install-ubuntu-18.04-mongodb-dependancies.sh
This is the script that will be run - you DO NOT need to run this after you have run the above.
#!/bin/bash
sudo apt update
echo -e  "###############################################################"
echo -e  "# The following script installs and configures Formbird dependant software for"
echo -e  "# Formbird 2.1.x using MongoDb on Ubuntu 18.04"
echo -e  "###############################################################"
echo -e  "# Dependancy Install"
echo -e  "###############################################################"

# Tools / utilities
echo -e  "###############################################################"
echo -e  "# Step 1 of 11 - Tools / utilities"
echo -e  "###############################################################"

sudo apt install build-essential software-properties-common p7zip-full htop -y

# NodeJS
echo -e  "###############################################################"
echo -e  "# Step 2 of 11 - NodeJS"
echo -e  "###############################################################"

sudo curl -sL https://deb.nodesource.com/setup_10.x | sudo bash -
sudo apt install nodejs -y

# MongoDB
echo -e  "###############################################################"
echo -e  "# Step 3 of 11 - MongoDB"
echo -e  "###############################################################"

sudo apt-key adv --keyserver hkp://keyserver.ubuntu.com:80 --recv 9DA31620334BD75D9DCB49F368818C72E52529D4

# MongoDB 4.x - Ubuntu 16.04
# echo "deb [ arch=amd64,arm64 ] https://repo.mongodb.org/apt/ubuntu xenial/mongodb-org/4.0 multiverse" | sudo tee /etc/apt/sources.list.d/mongodb-org-4.0.list

# MongoDB 4.x - Ubuntu 18.04
echo "deb [ arch=amd64 ] https://repo.mongodb.org/apt/ubuntu bionic/mongodb-org/4.0 multiverse" | sudo tee /etc/apt/sources.list.d/mongodb-org-4.0.list

sudo apt update
sudo apt install mongodb-org -y

# Java
echo -e  "###############################################################"
echo -e  "# Step 4 of 11 - Java"
echo -e  "###############################################################"

sudo apt install openjdk-8-jdk -y
sudo echo 'JAVA_HOME="usr/lib/jvm/java-8-openjdk-amd64/jre""' >> /etc/environment
echo 'JAVA_HOME="/usr/lib/jvm/java-8-openjdk-amd64/jre"'
source /etc/environment

# Elasticsearch 2.4
echo -e  "###############################################################"
echo -e  "# Step 5 of 11 - Elasticsearch 2.4"
echo -e  "###############################################################"

cd ~
wget https://download.elastic.co/elasticsearch/elasticsearch/elasticsearch-2.4.4.deb
sudo dpkg -i elasticsearch-2.4.4.deb

cd /usr/share/elasticsearch/bin
sudo ./plugin install mobz/elasticsearch-head

cd ~
sudo systemctl enable elasticsearch
sudo systemctl restart elasticsearch

# Python3
echo -e  "###############################################################"
echo -e  "# Step 6 of 11 - Python"
echo -e  "###############################################################"

sudo apt install python-pip -y

#sudo add-apt-repository ppa:deadsnakes/ppa -y
#sudo apt update
#sudo apt install python3.6 -y
sudo apt install python3-pip -y
sudo pip3 install --upgrade pip

# Python - mongo-connector
echo -e  "###############################################################"
echo -e  "# Step 7 of 11 - Python - mongo-connector"
echo -e  "###############################################################"

sudo pip3 install mongo-connector
sudo pip3 install elastic2-doc-manager
sudo pip3 install elastic-doc-manager[elastic2]

#sudo update-alternatives --install /usr/bin/python python /usr/bin/python3 1

# NGINX
echo -e  "###############################################################"
echo -e  "# Step 8 of 11 - NGINX"
echo -e  "###############################################################"

sudo apt install nginx -y

# Redis
echo -e  "###############################################################"
echo -e  "# Step 9 of 11 - Redis"
echo -e  "###############################################################"

sudo apt install redis-server -y

echo -e  "###############################################################"
echo -e  "# Step 10 of 11 - Config Files"
echo -e  "###############################################################"

cd ~
sudo sed -i '/\#replication/a replication:\n    replSetName: rs0' /etc/mongod.conf

printf '[Unit]\nDescription=replication of date between mongo and elasticsearch\nAfter=network.target mongo.service\n\n[Service]\nUser=mongodb\nGroup=mongodb\nRestart=always\nRestartSec=10\nExecStartPre=/bin/sleep 30\nExecStart=/usr/local/bin/mongo-connector -c /etc/mongo-connector.json\n\n[Install]\nWantedBy=multi-user.target\n' | sudo tee /lib/systemd/system/mongo-connector.service
printf '{\n "__comment__": "Configuration options starting with '__' are disabled",\n   "__comment__": "To enable them, remove the preceding '__'",\n   "mainAddress": "localhost:27017",\n "oplogFile": "/var/lib/mongodb/oplog.timestamp",\n  "noDump": false,\n  "batchSize": -1,\n  "verbosity": 1,\n   "continueOnError": false,\n "timezoneAware": true,\n\n  "logging": {\n      "type": "file",\n       "filename": "/var/log/mongodb/mongo-connector.log"\n    },\n\n  "docManagers": [\n      {\n         "docManager": "elastic2_doc_manager",\n         "targetURL": "localhost:9200",\n            "bulkSize": 1000,\n "batchSize":1000,\n         "uniqueKey": "_id",\n           "autoCommitInterval": null,\n           "args": {\n             "clientOptions": {"timeout": 2000}\n            }\n        }\n    ]\n}\n' | sudo tee /etc/mongo-connector.json
printf '\n#add_header Content-Security-Policy "default-src self; script-src self; img-src self data:; style-src self unsafe-inline; font-src self data:; frame-src self;;\n#add_header Referrer-Policy origin;\n#add_header Strict-Transport-Security "max-age=31536000; includeSubDomains" always;\n\nupstream formbird-cluster {\n\t# ip_hash is needed to ensure that websocket connections always go to the same instance in the cluster\n\tip_hash;\n\tserver localhost:3000;\n\tserver localhost:3001;\n#\tserver localhost:3002;\n#\tserver localhost:3003;\n#\tserver localhost:3004;\n#\tserver localhost:3005;\n}\n\nserver {\n\tserver_name localhost;\n#\tlisten 80;\n\tlisten 443 http2;\n#\terror_log /var/log/nginx/formbird.log debug;\n\n\tssl_certificate          /etc/ssl/private/private.formbird.com.bundle.crt;\n\tssl_certificate_key      /etc/ssl/private/private.formbird.com.key;\n\tssl on;\n\tssl_session_cache  builtin:1000  shared:SSL:10m;\n\tssl_protocols  TLSv1.1 TLSv1.2;\n\tssl_ciphers EECDH+AESGCM:EDH+AESGCM:AES256+EECDH:AES256+EDH;\n\tssl_prefer_server_ciphers on;\n\n\tgzip  on;\n\tgzip_vary on;\n\tgzip_proxied expired no-cache no-store private auth;\n        gzip_types *;\n\n\topen_file_cache          max=2000 inactive=20s;\n\topen_file_cache_valid    60s;\n\topen_file_cache_min_uses 5;\n\topen_file_cache_errors   off;\n\n#\tlocation ~ ^/(custom-images/|docs/|fonts/|images/|scripts/|styles/|vendor/|views/) {\n#\t\troot /path/to/formbird/server/public;\n#\t\taccess_log off;\n#\t\texpires max;\n#\t}\n\n\tlocation / {\n\t\tclient_max_body_size       50M;\n\t\tclient_body_buffer_size    128k;\n\t\tproxy_connect_timeout      180;\n\t\tproxy_send_timeout         180;\n\t\tproxy_read_timeout         180;\n\t\tproxy_buffer_size          4k;\n\t\tproxy_buffers              4 32k;\n\t\tproxy_busy_buffers_size    64k;\n\t\tproxy_temp_file_write_size 64k;\n\t\tproxy_set_header    X-Real-IP       $remote_addr;\n\t\tproxy_set_header    X-Forwarded-For $proxy_add_x_forwarded_for;\n\t\tproxy_set_header X-Forwarded-Proto $scheme; #for secured cookies\n\t\tproxy_set_header X-NginX-Proxy true;\n\t\tproxy_http_version 1.1;\n\t\tproxy_set_header Upgrade $http_upgrade;\n\t\tproxy_set_header Connection upgrade;\n\t\tproxy_set_header Host $http_host;\n\t\tproxy_cache_bypass $http_upgrade;\n\t\tproxy_pass http://formbird-cluster;\n\t}\n}\n' | sudo tee /etc/nginx/conf.d/formbird.conf

sudo systemctl restart mongod
sleep 10

mongo --eval 'rs.initiate({ _id: "rs0", members: [ { _id: 0, host:"localhost:27017" } ] });'
sudo systemctl enable mongod
sudo systemctl restart mongod

sudo systemctl restart elasticsearch
sudo systemctl daemon-reload
sudo systemctl enable mongo-connector
sudo systemctl restart mongo-connector

echo -e  "###############################################################"
echo -e  "# Step 11 of 11 - Setup private.formbird.com ssl certificate into nginx"
echo -e  "###############################################################"

cd ~/app/
mkdir ssl
cd ssl
wget download.formbird.com/private.formbird.com.ssl.7z
7z x private.formbird.com.ssl.7z
sudo cp * /etc/ssl/private
sudo systemctl restart nginx


echo -e  "###############################################################"
echo -e  "# Formbird Dependancies Installed"
echo -e  "# Now complete the installation with the install of Formbird via NPM"
echo -e  "# Install of based DB, the final configuration and setup of nginx"
echo -e  "###############################################################"
Step 4 - Install of yarn and pm2
Now install yarn and pm2
cd ~
mkdir ~/.npm-global
npm config set prefix '~/.npm-global'
echo 'export PATH=~/.npm-global/bin:/usr/local/share/.npm-global/bin/:$PATH' >> ~/.bashrc
. ~/.profile

npm install -g yarn
npm install -g pm2
Step 5 - Install of formbird
Under the user you created above download the formbird core installer To pull the latest version use:
yarn global add @formbird/core
Install formbird under ~/app
cd ~
mkdir app
cd app
formbird_install
Step 6 - Create base database
The following step will upload the default / seed database that is provided with the install. Warning - this will naturally wipe any existing mongodb of the same name, it is also assumed that the name of the database is going to be formbird. It is also assumed that you have maintained the default ports for elasticsearch (9200) and mongodb (27017).
cd ~/app
curl -XDELETE http://localhost:9200/formbird/
curl -XDELETE http://localhost:9200/mongodb_meta/
curl -H "Content-Type: application/json" -X POST --data @./formbird-web-app/utils/elastic/elastic-template.json 'http://localhost:9200/formbird'

cd ~/app/formbird-web-app/utils/mongodb/formbird-mongodb-base.dmp/
mongorestore --db formbird --drop ./formbird
Step 7 - First Run
The following will start your formbird server for the first time.
cd ~/app/formbird-web-app
pm2 start ./utils/pm2/processes.json
To check that the server is running you can run the following two pm2 commands (see PM2 Runtime Overview for more pm2 commands and functions)
pm2 list
pm2 logs
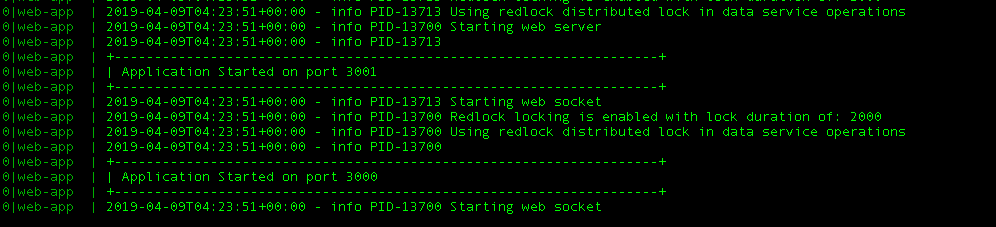
The resulting output from pm2 if the server is now active should look like;
Step 8 - Formbird auto restart on reboot
To make pm2 autostart formbird on reboot then perform the following. You can also get analysis and monitoring of the formbird and other server processes by subscribing to PM2 Services. The following assumes that you are operating the application under the user ubuntu.
pm2 kill
pm2 startup
sudo env PATH=$PATH:/usr/bin /home/ubuntu/.npm-global/lib/node_modules/pm2/bin/pm2 startup systemd -u ubuntu --hp /home/ubuntu
cd ~/app/formbird-web-app
pm2 start ./utils/pm2/processes.json
pm2 save
Afer rebooting get the ip address of the server and try and connect your web browser to it
ifconfig
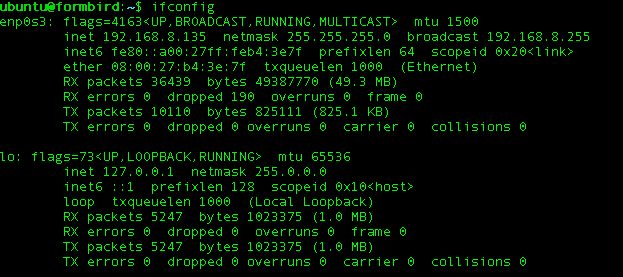
Navigate your browser to eg. (replace with your ip address) https://192.168.8.135 and login with the default user name and password;
Formbird Web Interface : https://192.168.8.135 (ensure you navigate to HTTPS not HTTP)
User Name: admin@formbird.com Password: Formbird123!
Please change the password on this account on login.
If everything has been successful you should be presented with

and then

With a successful login of

Step 8 - Providing access to MongoDB and Elasticsearch
The following steps will help provide access to MongoDB and Elasticsearch. This will expose both onto your network. As this base install does not utilise passwords on the db and exposing either MongoDB or Elasticsearch on the internet will result in a hack and loss of data the above install is not designed for production deployment or direct connection to the internet.
Providing access to Elasticsearch The following command will edit the /etc/elasticsearch/elastitcsearch.yml setting network.host: 0.0.0.0 ie. binding the elasticsearch service to all network ports.
sudo sed -i '/192.168.0.1/a network.host: 0.0.0.0' /etc/elasticsearch/elasticsearch.yml
To access elasticsearch head (replace the ip address with your servers ip address):
http://192.168.8.135:9200/_plugin/head
Providing access to MongoDB The following command will edit the /etc/mongod.conf setting bindIp: 0.0.0.0 ie. binding the mongodb service to all network ports.
sudo sed -i 's/127.0.0.1/0.0.0.0/' /etc/mongod.conf
You can now access MongoDB. A great tool for directly accessing MongoDB is Robomongo available at robomongo.org